VPN: Secure connection to the network of the University of Basel
Working from home? VPN - Virtual Private Network - offers a secure connection to the network of the University of Basel. Regardless of whether you are working at a desktop computer or on the road with your laptop, you can use VPN to access internal university resources or, via the university network, external resources that can only be accessed from the university network (e.g. online journals). If, on the other hand, you want to view web pages, the simple WebVPN service is usually sufficient. For full access, your computer can become part of the network of the University of Basel via a so-called VPN tunnel. In order to establish such a connection, a special software (VPN Client) has to be installed. This software is available for Windows, macOS and Linux. On this page you will find instructions on how to connect to WebVPN and install the VPN client on your personal device. When connecting via VPN, the directives of the Rectorate on the use of IT resources apply.
I have installed GlobalProtect on my home computer. Now the computer wants to establish a VPN connection all the time. What can I do?
During the changeover, we made a conscious decision to have the VPN client connect automatically for employees, regardless of the device. (Mobile devices such as smartphones and tablets are excluded). However, the automatic connection can of course be deactivated manually. To do this, please click on the “Disconnect” button in the GlobalProtect client. After a “Disconnect”, the client must be reconnected manually, even after a restart. Detailed information can be found in the knowledge database.
I was previously able to log in with my username, but now I can only log in using my e-mail address. Is that correct?
Yes, with the changeover to GlobalProtect we have made some changes to the authentication process. You can now only log in with your e-mail address.
I do not have access to a website or service that I urgently need for my work
Please send the relevant website and the reason for use as a ticket to the Service Desk or request the exception rule directly via NetSec.
Both GlobalProtect and another VPN client establish a connection. Is this a problem?
Both VPN clients can be installed on your end device, this is not a problem. A simultaneous connection of both clients can lead to problems. Therefore, please ensure that only one client establishes a connection at a time.
I want to make personalized settings for GlobalProtect.
In order to make working with the VPN client as easy as possible for all users, we have decided not to offer any separate connection options. This also ensures greater security.
Do I have to log in again if I disconnect via cable?
No, GlobalProtect automatically recognizes the change and directly establishes a VPN connection to the university network.
I have a problem using GlobalProtect but urgently need to access the university network?
Please report the relevant problems with GlobalProtect as a support ticket directly to the Service Desk.
How often is the GlobalProtect Client updated?
A client update is typically available every 3-6 months and is automatically installed on your client (Windows and Mac) as soon as you have logged in. Under Linux, you will receive a message after logging in with information on where you can download the new GlobalProtect client.
I am working from home and would like to use my printer, is that possible?
All employees and external service providers of the University of Basel can access local network devices such as the private printer without having to disconnect from GlobalProtect.
My GlobalProtect client also connects when I am connected to the university network by cable. Is that what you want?
Yes, for the employees of the University of Basel we have deliberately decided that the VPN client will connect automatically. The GlobalProtect client connects to the university network, but no VPN connection is established. You can find detailed information on this in the knowledge database.
I was able to install the GlobalProtect client on my Mac, but I can't start the client, what happened?
In order for the client to start, there must be space available in the Mac menu bar (top right) for the “icon”. If the menu bar is full, something must be closed or removed so that the GlobalProtect client can be started.
Instructions
With the WebVPN, a secure connection to the VPN servers of the University of Basel can be established from any computer via an internet browser. In doing so, a VPN session is established in your web browser. With this WebVPN connection you can use most of the offers directly, but there are some restrictions regarding the functionality compared to the VPN client. The WebVPN service is basically open for all members (employees and students) of the University of Basel. WebVPN can be used if the conventional VPN software cannot be installed or used. With a click on the button below you can connect to WebVPN.
Requirements
a) You have administrator rights on your computer.
b) You know the terms of use of the University of Basel.
c) You need your current login credentials of the University of Basel (username and password).
d) Only the latest three macOS versions are supported (please note that beta versions are excluded).
Installation
Connect to a WLAN network (unibas-public or eduroam) in buildings of the University of Basel or use an alternative internet connection.
Click on the "macOS CLIENT" button below.

The standard university login window will now appear. Enter your University of Basel email address (1) and then click on "Next" (2):

Then enter your password (1) and click on "Sign in" (2):

If you have already set up the so-called "2-Step Login", a window will now appear to confirm the login with the method you have set up (approval via Microsoft Authenticator/code from Authenticator App/SMS code).
If you have not yet set up the "2-Step Login", a window will now appear asking you to set up the required method. Information on this can be found hier.

Then click on the link for your operating system ("Download Mac 32/64 bit GlobalProtect agent") and the file will be downloaded:

If a pop-up window appears asking you whether you would like to download the file, confirm this by clicking on "Allow":

Now start / open the downloaded file. This will normally be located in the "Downloads" folder (e.g.: GlobalProtect.pkg):

Click on "Continue" in the installation dialog:

Make sure that the items "GlobalProtect" and "GlobalProtect System extensions" (1) are checked (if the second one is not checked, mark it for installation). Proceed by clicking the "Continue" button (2):

Start the installation process by clicking on "Install":

In the following dialog, enter the administrator password of your Mac and click on "Install Software":

After the successful installation you can close the dialog:

In the next step, you can keep or move to bin the installation file. If you want to reinstall or uninstall GlobalProtect in the future, you should select "Keep":

In addition, 2 notifications are displayed, the first of which must be accepted by clicking on "Allow" and the second can simply be closed:

The program starts and a new window appears. Continue by clicking on "Get Started":

Enter the server "vpn.unibas.ch" (1) at the first start. Then click on "Connect" (2) to establish a VPN connection:
The standard university login window will now appear. Enter your University of Basel email address (1) and then click on "Next" (2):
Then enter your password (1) and click on "Sign in" (2):
If you have already set up the so-called "2-Step Login", a window will now appear to confirm the login with the method you have set up (approval via Microsoft Authenticator/code from Authenticator App/SMS code).
If you have not yet set up the "2-Step Login", a window will now appear asking you to set up the required method. Information on this can be found hier.

You will see a window in which you should open the system settings by clicking on "Open System Settings":

Then click on "Allow" in the opened system settings to activate GlobalProtect:

In the following dialog, enter the administrator password of your Mac and click on "Modify Settings":

In the next window, allow GlobalProtect to function by clicking on "Allow".
We strictly adhere to data protection and do not explicitly monitor any users.

You will now be connected to the University of Basel network:
Use of the program

You can find the program by starting the Finder from the Dock and navigating to the "Applications" folder. Start the VPN client by clicking on the "GlobalProtect" icon:
At the first start, if you didn't do it during the installation, enter the server name "vpn.unibas.ch" and click on "Connect" to establish a VPN connection.
The standard university login window will now appear. Enter your University of Basel email address (1) and then click on "Next" (2).
Then enter your password (1) and click on "Sign in" (2):
If you have already set up the so-called "2-Step Login", a window will now appear to confirm the login with the method you have set up (approval via Microsoft Authenticator/code from Authenticator App/SMS code).
If you have not yet set up the "2-Step Login", a window will now appear asking you to set up the required method. Information on this can be found hier.
You will now be connected to the University of Basel network:
Disabling the VPN connection

By clicking on the GlobalProtect icon (1) in your taskbar and on the hamburger menu icon (icon with three horizontal lines) at the top right of the program window (2) and "Disconnect" (3), you can disconnect as soon as you no longer need the VPN connection:
Requirements
You have administrator rights on your computer.
Deinstallation

Uninstall the program by executing the installation file (as for installation), selecting "Uninstall GlobalProtect" (1) and clicking "Continue" (2).
If the GlobalProtect installation file is not present on your computer, you must download this file using the installation instructions above.

Start the uninstall process by clicking on "Install":

In the following dialog, enter the administrator password of your Mac and click on "Install software":

Confirm the uninstallation of the system extensions used by GlobalProtect by clicking on "OK":

After the successful deinstallation you can close the dialog:
Requirements
a) You have administrator rights on your computer.
b) You know the terms of use of the University of Basel.
c) You need your current login credentials of the University of Basel (username and password).
d) A supported Linux operating system: Ubuntu 22.04 LTS or Ubuntu 24.04 LTS only.
Other Linux distributions and Ubuntu non-LTS versions are not supported.
Username:
If you do not know your username, you can find it in the Viaweb self-service portal.
Installation
Connect to a WLAN network (unibas-public or eduroam) in buildings of the University of Basel or use an alternative internet connection.

Click on the "LINUX CLIENT" button below and enter the username (not the e-mail address) and password of the uniaccount in the popup. You will be asked for your login credentials (username, e.g. muster0000, and password) of the University of Basel. Make sure that you enter the username and not the e-mail address in the first field. The download will start after successful authentication. Save the file.

Using the terminal, navigate to the folder in which you downloaded the file (e.g. cd ~/Downloads/). Then unpack the entire contents of the downloaded .tgz archive into a new folder (by using the command tar -xzf PanGPLinux-6.2.9-c4.tgz --one-top-level). Then navigate to the newly created folder (cd PanGPLinux-6.2.9-c4):

Then execute the installation file: ./gp_install.sh and enter your administration password when prompted.
The installation now starts, all required components are automatically downloaded and installed, and the progress is displayed in the terminal window.

If this message appears during installation, type y and press Enter to continue:
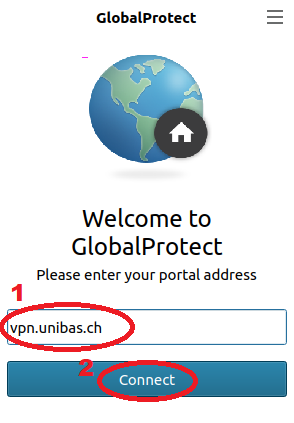
As soon as the installation is complete, the GlobalProtect window appears. Enter the server «vpn.unibas.ch» at the first start (1). Then click on «Connect» to establish a VPN connection (2):

The standard university login window will now appear. Enter your University of Basel e-mail address (1) and then click on «Next» (2):

Then enter your password (1) and click on «Next» (2):

If you have already set up the so-called "2-Step Login", a window will now appear to confirm the login with the method you have set up (approval via Microsoft Authenticator/code from Authenticator App/SMS code).
If you have not yet set up the "2-Step Login", a window will now appear asking you to set up the required method. Information on this can be found hier.
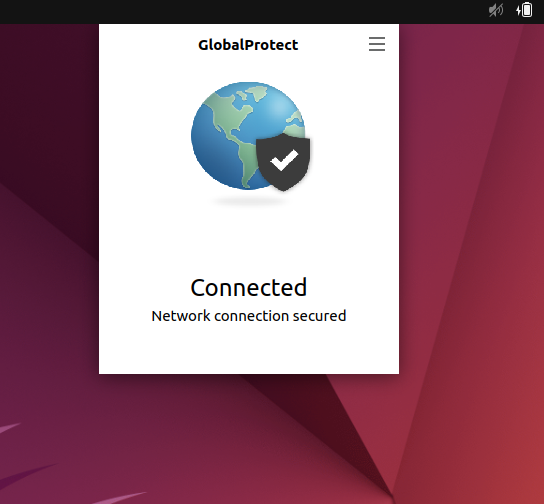
You will now be connected to the University of Basel network.
Please note: If the GlobalProtect icon doesn't appear in the top GUI taskbar you can always re-launch the GlobalProtect window (to connect or disconnect) just by re-launching the App from Applications List («Show Applications»).
Use of the program

You can start GlobalProtect by opening the application list («Show Applications»), clicking in the lower left corner of the desktop (1), entering "GlobalProtect" and clicking on the application icon (2):
Disabling the VPN connection
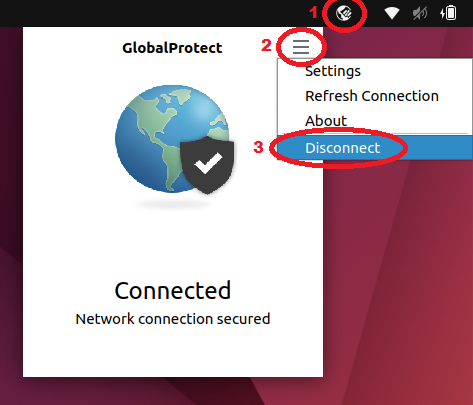
By clicking on the GlobalProtect icon (1) in your taskbar and on the hamburger menu icon (icon with three horizontal lines) at the top right of the program window (2) and "Disconnect" (3), you can disconnect as soon as you no longer need the VPN connection:
Deinstallation
Uninstall the program by navigating to the path of the unpacked GlobalProtect files in the terminal (e.g. cd ~/Downloads/PanGPLinux-6.2.9-c4), then calling the command ./gp_uninstall.sh and entering your administration password when prompted.
Update
On Linux, GlobalProtect updates are not performed automatically, as is the case on Windows or macOS. Updates must therefore be carried out manually.
To update, download the newer version of the GlobalProtect client and install it as described in the "Installation" section. The installation can be performed over the existing version; prior uninstallation is not required.
An update is only necessary when needed, for example in the case of known issues or incompatibilities. As long as the currently installed version of GlobalProtect works correctly, updating is not mandatory.
Requirements
a) You have administrator rights on your computer.
b) You know the terms of use of the University of Basel.
c) You need your current login credentials of the University of Basel (username and password).
d) The following Windows versions are supported:
- Windows 11 (64-bit (x64) and ARM64 devices)
- Windows 10 (64-bit (x64), 32-bit (x86), and ARM64 devices) - VPN access is available only until 15 October 2026; from that date, Windows 10 will no longer be supported and access to the VPN service will be blocked
Installation
Connect to a WLAN network (unibas-public or eduroam) in buildings of the University of Basel or use an alternative internet connection.
Click on the "WINDOWS CLIENT" button.

GlobalProtect version for ARM-based devices
In a few cases (e.g. various devices with ARM processors such as the Microsoft Surface, Lenovo ThinkPad X13s, Samsung Galaxy Book S or HP Elite Folio) a different version (arm64) is required. You can check whether your device uses an ARM processor under Settings → System → About → System type. You can find the installation file here. You will then be asked for your login credentials (username e.g. muster0000 and password) of the University of Basel. If your username is not known to you, you can view it in the SelfService Portal Viaweb. Enter them and make sure that you enter the username and not the e-mail address in the first field. The download will start after successful authentication:
The standard university login window will now appear. Enter your University of Basel email address (1) and then click on "Next" (2):
Then enter your password (1) and click on "Sign in" (2):
If you have already set up the so-called "2-Step Login", a window will now appear to confirm the login with the method you have set up (approval via Microsoft Authenticator/code from Authenticator App/SMS code).
If you have not yet set up the "2-Step Login", a window will now appear asking you to set up the required method. Information on this can be found hier.

Then select the version suitable for your operating system (32/64 bit). If you click on the link, the file will be downloaded.
If you don't know if your computer is running a 32-bit or 64-bit version of Windows:
1) Select the Start button, then select Settings > System > About.
2) At the right, under Device specifications, see System type.

Now start / open the downloaded file. This will normally be located in the "Downloads" folder (file name, e.g.: GlobalProtect64.msi):

The installation will now start and the installation dialog will appear in a new window. Continue with a click on "Next":

Continue by clicking on "Next" again:

In the following dialog step, you can now start the installation by clicking the "Next" button:

Windows will ask you in a security message if you want to install the software. Confirm this query with "Yes" (enter the password of your computer if necessary):

The program will now be installed. To exit, click on "Close":
Use of the program

Start the program "GlobalProtect", to be found in the start menu under "Palo Alto Networks":

The program starts and a new window appears. Continue by clicking on "Get Started":

Enter the server "vpn.unibas.ch" (1) at the first start. Then click on "Connect" (2) to establish a VPN connection.
The standard university login window will now appear. Enter your University of Basel email address (1) and then click on "Next" (2):
Then enter your password (1) and click on "Sign in" (2):
If you have already set up the so-called "2-Step Login", a window will now appear to confirm the login with the method you have set up (approval via Microsoft Authenticator/code from Authenticator App/SMS code).
If you have not yet set up the "2-Step Login", a window will now appear asking you to set up the required method. Information on this can be found hier.

You will now be connected to the University of Basel network:
Disabling the VPN connection

By clicking on the GlobalProtect icon (2) in your taskbar (1) and on the hamburger menu icon (icon with three horizontal lines) at the top right of the program window (3) and "Disconnect" (4), you can disconnect as soon as you no longer need the VPN connection:
Deinstallation

Uninstall the program via the Control Panel:
iOS / Android / Chrome OS
Install the GlobalProtect app from the
The server address is:
vpn.unibas.ch
follow the further instructions on the device to connect.
Service Desk
IT-Services
Spitalstrasse 41, 3rd Floor
CH-4056 Basel
Phone +41 61 207 14 11
E-mail support-its@unibas.ch
Quick Links